In today’s day and age of advanced technology, nothing seems impossible. So much so that the latest labour market statistics show that self-employment accounted for 37% of the increase in employment during the past year in the UK alone.
The fashion industry is one sector where there has been a large influx of new blood. While in the past one may have had an idea and not done much about it, today it’s an entirely different story – we have an idea and we know we have infinite possibilities to make it happen. But how do we translate an idea into a finished product ready to show to buyers?
As a new fashion designer, you’ll run through the gamut of emotions once you have embarked on a creative project. Many thoughts will occupy your mind, ranging from doubt to exhilaration. They often come one after the other, in quick succession or at times even together and never leave you for long, so be warned and get used to it.
Never underestimate the importance of sampling as it is at the heart of production.
How do you go from idea to finished product?
Once you’ve taken a pause for thought, you may then ask yourself how can you turn your sketch into the finished product, ready for sale.
The first place to start is to create samples of your designs. Testing your ideas in order to ascertain their viability is a fundamental aspect of creating a fashion collection and a finished product.
Never underestimate the importance of sampling as they’re at the heart of production. Samples, aka design prototypes, make up your collection, should lead to the perfect fit, instruct volume production, and act as the showpieces that drive buyers to your showroom door.
If you are a clothing company, you will use these samples to define construction guidelines, as well as fit specifications and the grading of sizes up and down.
In fact, they’re an essential part of clothing and accessories production.
But how do you go about making design prototypes? What are the different types of samples, and how exactly they are utilized?
There are three types of samples that are required, these include:
- a prototype/fit sample
- a salesman (selling) sample
- a production sample
The fit sample is exactly what it sounds like – it is a production of your design specifically for fit. This sample does not have your brand-specific trims but does use your fabric.
This gives you the opportunity to really find the flaws and fix them from the beginning. Producing a “fit sample’ allows you to see your design in three dimensions.
Rough prototypes or first prototypes do not typically include extras such as pockets and trims. It is purely to allow you and your designer/pattern maker to focus on construction.
Design details such as epaulettes, pockets or other details are sometimes drawn onto the first prototype.
To successfully create a great prototype/first sample, follow these 7 steps:
1. Determine the size of your samples
If you are making samples for clothing, in the first instance they are used for fittings, which means that you will want your sample to be a size that can be logically graded both up and down to achieve a good fit in all your desired sizes.
While the chosen size may vary, the industry standard used by most companies is a size 10 for clothing, size 37/38 for shoes and accessories usually are one-size-fits-all.
Secondly, the samples will be used as a sales tool, for photo shoots, or a catwalk show so they need to fit models.
2. Understand your sample size’s body measurements
These measurements are not necessarily the same as your clothing specs, but knowing how the body measures underneath your finished design will give you a better idea of what your clothing measurement should be.
It is also important to understand that not all size 10 garments fit the same way, so understanding your brand’s customer profile of that size is important to your brand identity as well.
Therefore, knowing your customer and target market is of great importance.
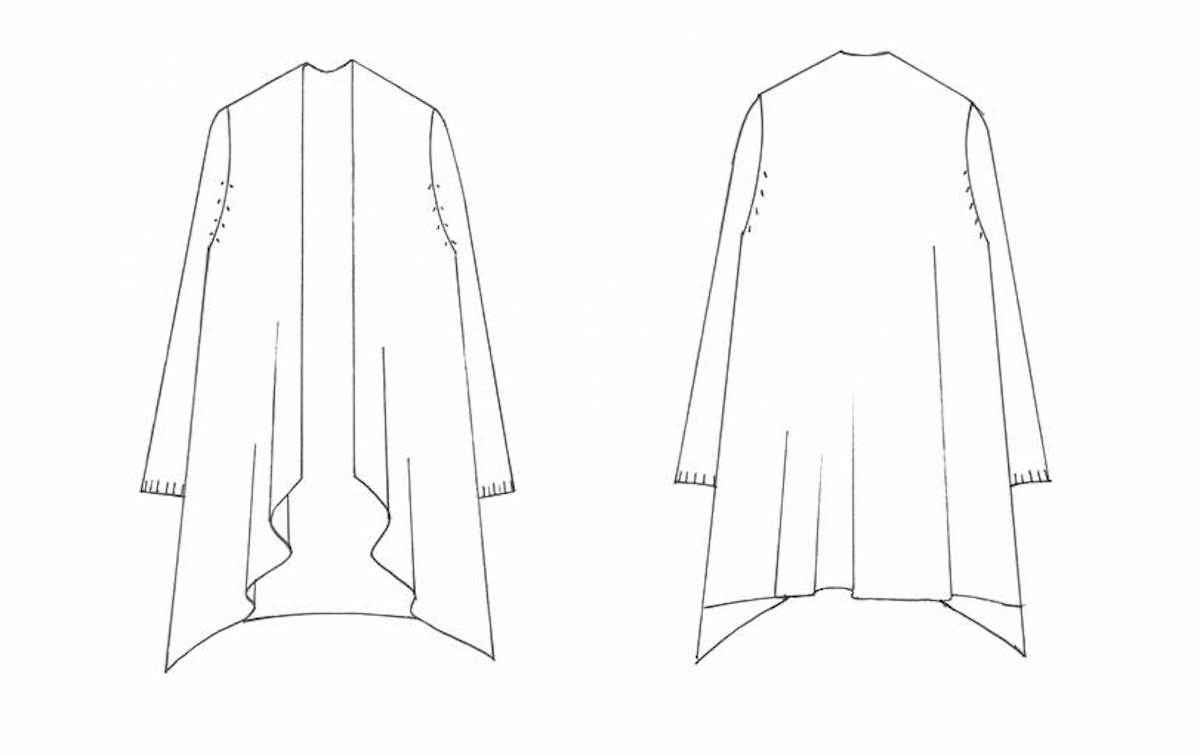
3. Create a flat sketch
Also known as a technical drawing or just simply, a flat.
A good flat sketch has simple lines, with no shading or colouring in, and can be done by hand or with Adobe Illustrator.
It is important to have a clear outline of your silhouette as if it were laid flat on a table. You can then add a solid line at any place where there is a seam, and represent all stitching with dashed lines, zigzags or other renderings of specific stitches.
Pattern makers use these renderings to create the patterns, so simple lines rather than stylised are always best.
Related reading: How to Get the Best Out of Your Pattern Cutter
4. Give initial specs
Specs contain vital information necessary for the creating of your samples. As getting the fit right is essential, the specs should clearly outline the measurements of a garment/product laid out in an easy-to-read chart.
For the most part, a pattern maker will need the basic specs such as body length, sweep circumference, across the shoulder, sleeve length, or simple dimensions for accessories, etc. This is when knowing your sample size (body measurements) will come in handy.
Be sure to note any placements of trims or embellishments. It is also helpful to understand your fabric and how the stretch, thickness, and drape will affect your garment and therefore your measurements.
5. Create a pattern
The pattern will need to be drafted by a professional pattern cutter or created in-house at the factory or sampling facility. They will use the specs provided as a template to create the pattern.
6. Organise all your fabric and trims
To avoid mistakes, it is essential to provide your sample room with all the supplies needed for your garment in an organized and easy-to-follow way. These are best listed and maintained until production in the form of a spec sheet.
7. Supply a Specification Sheet
This is produced to provide essential details to ensure the correct execution of your designs into a professionally finished product. It should be given to the factory whenever a sample needs to be made.
This will enable the factory and the production staff to know exactly what is supposed to happen with the construction and trims for each style.
Providing this occurs, then the execution of accurate samples will improve turnaround time and simplify communication during each stage of manufacturing and quality control.
With your completed prototype, the first thing that should be done is to try it on a fit model. This process will determine what fit or style changes need to happen to the pattern in order to perfect it.
It is preferable to do this as early as possible so that any amendments can be dealt with quickly. Occasionally further revisions to the style will be necessary.
Once any pattern corrections have been made, the salesman samples will need to be tackled. This is a version of your design that includes all brand-approved fabric and trims. This is the version that you would show to buyers when presenting your collection.
This also gives you the chance to test trim and fabric combinations, another step in the fine-tuning process. These usually consist of one piece in all of the different colours you have chosen for marketing and sales.
It’s wise to produce the full spectrum since sales figures are often largest for the colours the sales agent shows the buying team.
Salesman samples are commonly used for photo shoots and catwalk shows.
However, if the designer opted for sales samples in an alternative size for the sake of proper fit or to better suit a particular target customer, it is possible the patterns will need to be graded prior to photoshoot samples being made.
The final sample required is your production sample. This, along with your tech pack, is what your production team will use as a guide to turn your vision into the finished product that is stocked on the shop floor.
When production is in progress, it’s very important to monitor quality as compared to your samples, as these are what buyers will use to write their orders.
A buyer will usually ask whether your production quality will surpass the sample quality and this should be the aim of the factory producing your goods.
You may well ask why it’s necessary to produce so many samples, but remember there are many partners in the product’s development. These include the designer, the pattern cutter, each factory you will get quotes from, photographers, the press, and the very important buyers.
With only one sample, each one of these partners will have to wait until they can receive it from someone else. It slows an already long process down and creates a much longer turn-over rate, which will put you at the bottom of the queue in everyone’s eyes.
Furthermore, should anything happen to that single sample, it would be disastrous for your fledgling business.
Sampling is a very expensive process, as the pattern cutter and factory will charge double the amount they would if they were producing in bulk.
During these developmental stages, costs can soar, so it would be practical to produce further samples after you have fine-tuned the designs, thus avoiding unnecessary costs.
So now that it’s clear how to turn your idea into a finished product, it’s important to remember a few things.
The production team that you eventually appoint are not mind-readers. Therefore, make sure that all of your tasks are professionally executed.
If your customer profile is correct this will ensure that you get your sizing right. Are your flat drawings clean and linear? Your pattern should fit together like a jigsaw so check this before you take it to the factory.
All fabrics and trims should be delivered, along with your pattern, to the factory. Most importantly, is your spec sheet specific and clear? Providing all of these things are done you will be on your way to creating your dream collection.
Top Tips to turn your idea into a finished product.
- Be confident and believe in your abilities.
- Decide on your initial sample size.
- Research your ideal customer and use the results to inform your measurements.
- Ensure your specs are correct.
- Find a pattern cutter through People Per Hour or similar platforms.
Create a specification sheet as early as possible and keep updating it constantly until the product is finalized and signed off.
It is also necessary that you maintain your brand’s identity so here are 5 tips increase your brand’s value.
[convertkit form=789965]


